Skip to content
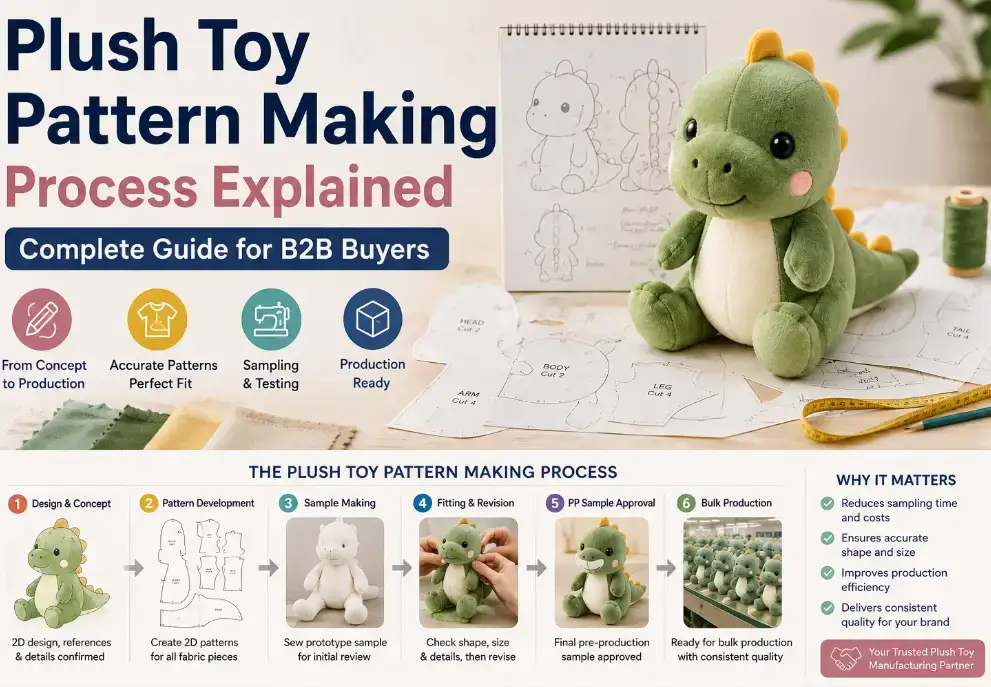
Plush Toy Pattern Making Process transforms a 2D character design into accurate 3D fabric pieces, ensuring the finished plush toy has the right shape, proportions, details, and production quality.
Every custom plush toy that reaches mass production began as a flat design on a screen or a piece of paper. Somewhere between that flat artwork and the first physical sample, a technical process took place that most buyers never see and rarely think to ask about — a process that determines, more than any other single step in development, whether the finished product actually looks like the design that was approved.
That process is pattern making: the engineering discipline that translates a two-dimensional character illustration into a set of flat fabric panels that, once cut, sewn, and stuffed, produce a three-dimensional plush toy with the correct shape, proportion, and character. Buyers who understand pattern making at even a basic level ask better questions during factory selection, write more effective design briefs, and recognize far more quickly when a sampling deviation traces back to a pattern problem rather than a construction or material issue.
Most sourcing guides skip past pattern making entirely, treating it as an invisible internal factory process buyers do not need to understand. This is a mistake — pattern making is arguably the single highest-leverage technical stage in the plush toy development cycle, the stage where more first-sample accuracy is won or lost than at any other point. This guide explains exactly how the process works, from initial design interpretation through digitization and grading, and what buyers should know at every stage to work more effectively with their manufacturing partner.
What Is Plush Toy Pattern Making and Why Does It Determine Everything That Follows?
Plush toy pattern making is the technical process of converting a two-dimensional design concept into a set of flat fabric panels — called pattern pieces — that, when cut and sewn together in a specific sequence, produce the intended three-dimensional plush toy shape. It sits at the intersection of geometry, textile engineering, and craft skill, performed by a specialized technician, the pattern maker, whose training and experience directly determine how accurately the finished product matches the original design intent.
Pattern making determines everything that follows because every subsequent stage — cutting, sewing, stuffing, quality inspection, and eventually mass production — depends on the pattern being geometrically correct. A pattern with an error in proportion, curvature, or seam placement will produce a flawed sample regardless of how skilled the sewing team is or how high-quality the materials are. Sewing and stuffing can only faithfully execute what the pattern defines; they cannot correct a pattern that is fundamentally wrong.
Pattern Making’s Position in the Plush Toy Development Sequence
| Development Stage | What Happens | Dependency on Pattern Accuracy |
|---|---|---|
| Design brief and artwork | Concept, proportions, and character defined | Pattern maker’s primary reference input |
| Pattern making | 2D artwork converted to flat pattern pieces | Foundational — all downstream stages depend on this |
| Material cutting | Pattern pieces used as cutting templates | Directly reproduces any pattern error at scale |
| Sewing and assembly | Panels joined per pattern seam allowances | Cannot correct proportion or curvature errors |
| Stuffing | Filling shapes the sewn shell | Reveals pattern volume and dart errors visibly |
| First sample evaluation | Sample compared against design brief | Pattern errors are the most common root cause of shape deviation |
| Grading (size variants) | Pattern scaled to produce size range | Errors in the base pattern multiply across every size |
| Mass production | Patterns used as standard cutting dies or templates | Pattern quality directly governs production consistency |
Why Pattern Making Is Different From Garment Pattern Making
Buyers with a textile or apparel background sometimes assume plush toy pattern making follows the same logic as garment pattern making, since both start with flat fabric and produce a three-dimensional result. The two disciplines share foundational principles, but plush toy pattern making solves a meaningfully different problem: garment patterns are drafted around a standardized human body reference with established sizing systems, while a plush toy pattern must create an entirely novel three-dimensional form for every new character, with no standard reference to work from, and must account for the volumetric effect of dense polyester filling — a variable that behaves very differently under a seam than a human body does.
A plush toy pattern maker is, in effect, solving a sculptural problem using flat fabric geometry, which is why the most skilled pattern makers develop their expertise over years of iterative, character-specific experience rather than through standardized training alone.
How Does a 2D Character Design Become a 3D Pattern?
The transformation from flat character artwork to a working three-dimensional pattern is the technical heart of the entire process, happening through a structured sequence of analytical and creative decisions an experienced pattern maker works through for every new design.
The process begins with silhouette analysis, in which the pattern maker studies the character’s front, side, and back views to understand its overall volume distribution and identify which body regions require the most careful shaping. This is followed by segment planning, where the form is mentally divided into individual three-dimensional volumes — head, body, limbs, ears, tail — that can each be constructed from a manageable number of flat panels. The pattern maker then develops the panel shapes for each segment, working out the curves, darts, and seam lines that will produce the correct volume once joined and stuffed.
Stages of 2D-to-3D Pattern Development
| Stage | What the Pattern Maker Does | Key Technical Decision |
|---|---|---|
| Silhouette analysis | Studies reference art from all angles | Identifying proportional relationships between body segments |
| Segment planning | Divides the character into constructible volumes | How many panels each segment requires |
| Panel shape development | Drafts the flat shape of each panel | Curvature, dart placement, seam positions |
| Seam line planning | Decides where panels join on the finished form | Balancing visual concealment against construction feasibility |
| Mock-up construction | Builds a rough muslin or scrap-fabric test version | Validating volume and proportion before committing to final fabric |
| Pattern refinement | Adjusts panel shapes based on mock-up results | Correcting proportion, dart depth, or seam curvature |
| Final pattern finalization | Produces the confirmed, production-ready pattern | Locking dimensions before cutting real materials |
The Role of Darts and Seam Curvature in Shaping Volume
A flat piece of fabric is inherently two-dimensional, and creating a rounded, organic three-dimensional form from it requires specific geometric techniques that allow the fabric to curve and bulge in controlled ways once it is stuffed. The two primary tools a pattern maker uses to achieve this are darts and curved seam lines.
A dart is a tapered fold or seam sewn into a flat panel that removes excess fabric at one point while leaving the surrounding fabric flat, creating a controlled bulge — commonly used at the base of an ear, the tip of a nose, or a limb joint where a concentrated volume change is needed. Curved seam lines, by contrast, distribute the shaping effect gradually across a seam’s length, the more common approach for the broad, rounded forms that characterize most plush toy bodies and heads. The pattern maker’s judgment about when to use a dart versus a curved seam — and precisely how deep or curved to make it — is one of the most consequential decisions in the entire pattern, directly determining whether the finished, stuffed form reads as smoothly rounded and appealing or as lumpy and off-model.
Tip — Ask to See the Mock-Up Stage Before the First Formal Sample Is Built
Many buyers only see the development process at the first formal sample stage, after the pattern maker has already committed to a specific panel configuration and the sample has been sewn in the actual specified fabric. Requesting visibility into the mock-up stage — the rough test version, often built in inexpensive scrap or muslin fabric before final materials are cut — gives buyers an earlier and cheaper opportunity to catch proportion or silhouette problems. A mock-up is faster and less costly to produce than a full first sample in final fabric, embroidery, and accessories, so corrections identified at this stage are essentially free compared to the same correction requested later. Not every factory offers mock-up visibility as standard, but for complex designs, unusual proportions, or a buyer’s first project with a new manufacturer, explicitly requesting to see the mock-up before the full sample is committed is a low-cost way to catch pattern-level problems at their earliest and least expensive point.
What Are the Core Pattern Making Techniques Used in Plush Toy Development?
Pattern makers draw on two fundamentally different working methods, and understanding the difference helps buyers assess a factory’s technical capability and interpret why certain design requests are more or less straightforward to execute.

The two core techniques are draping, in which the pattern maker works directly with fabric on a physical or virtual form to develop panel shapes through hands-on manipulation, and flat pattern drafting, in which panel geometry is developed mathematically using measurements, curves, and established proportional formulas without first working the fabric by hand. Most experienced pattern makers use a hybrid of both, starting with flat drafting for the overall proportional framework and refining specific problem areas through draping and mock-up testing.
Comparison of Core Plush Toy Pattern Making Techniques
| Technique | How It Works | Best Suited For | Limitation |
|---|---|---|---|
| Draping | Fabric manipulated directly on a form to develop shape | Organic, asymmetric, or highly sculptural designs | Time-intensive; harder to document and reproduce precisely |
| Flat pattern drafting | Panels developed mathematically from measurements and curves | Geometric or proportionally regular designs | Can miss subtle volumetric nuances that draping reveals |
| Hybrid approach | Flat draft for framework, draping to refine problem areas | Most commercial plush toy development | Requires pattern maker skilled in both methods |
| Digital 3D modeling | Panels derived computationally from a 3D digital model | Complex characters, licensed IP requiring precise brand matching | Requires software investment and specialized digital pattern skill |
Digital 3D Modeling in Modern Pattern Making
An increasing number of higher-capability plush toy factories now incorporate digital 3D modeling into pattern development, particularly for complex characters or licensed IP where exact proportional matching to an approved digital brand asset is contractually required. In this approach, a 3D digital model is built first, and specialized software then unwraps that surface into flat 2D panel shapes — a process directly analogous to how a world map is unwrapped from a globe.
Digital 3D modeling offers meaningful advantages for precision-critical projects: proportional accuracy can be verified against the approved reference before any physical sample is built, revision iteration is significantly faster since adjustments can be made and reviewed digitally before cutting fabric, and it produces highly consistent, precisely documented pattern files that translate more reliably into grading and mass production. The trade-off is that digital modeling requires software investment and a different skill set than traditional hands-on pattern making, so not every factory offers it — and for simpler, traditionally styled designs, the added precision may not justify the added cost and timeline over an experienced pattern maker working by hand.
Tip — For Licensed IP or Brand-Matched Characters, Ask Specifically Whether the Factory Uses Digital 3D Pattern Modeling
When a design must match an existing licensed character or a brand’s established digital asset precisely — a common requirement for entertainment IP and mascot programs — the proportional accuracy bar is considerably higher than for an original design where some creative interpretation is acceptable. Traditional hands-on pattern making can absolutely achieve excellent results, but digital 3D modeling adds a layer of objective verification that is particularly valuable when a licensor will review the sample against strict brand guidelines. Before committing to a factory for a licensed program, ask directly whether digital 3D pattern modeling is part of their standard capability, and if so, request an example of how they used it to verify accuracy against a reference asset on a previous project. This single question is one of the more reliable ways to distinguish factories with genuinely advanced pattern engineering capability from those relying entirely on hand-drafting skill, which may still be excellent but carries a different risk profile for brand-critical accuracy.
How Do Seam Allowances, Ease, and Fabric Behavior Affect Pattern Accuracy?
Beyond the core shape of each panel, a pattern maker must account for several technical factors that do not appear as visible design elements but that directly determine whether the finished, sewn, and stuffed product matches the intended dimensions and silhouette.
These factors matter because the flat pattern piece is never identical to the finished, sewn panel — a consistent seam allowance must be added around every edge for stitching, a calculated ease factor must account for how much the fabric will stretch or compress once stuffed, and the chosen fabric’s stretch, recovery, and pile characteristics must be factored into every curve and dimension. A pattern that ignores any of these produces a sewn sample that measures differently than the flat pattern suggests — one of the most common sources of unexplained dimensional deviation in first samples.
Technical Factors That Affect the Relationship Between Flat Pattern and Finished Product
| Factor | What It Accounts For | Typical Range / Consideration | Consequence If Miscalculated |
|---|---|---|---|
| Seam allowance | Fabric consumed by the stitch line | 3–8 mm, depending on fabric thickness and seam type | Finished panel smaller than intended if underestimated |
| Stuffing ease | Volume expansion once filling is added | Varies by target firmness and fabric stretch | Finished product tighter or looser than target silhouette |
| Fabric stretch factor | How much the specific fabric stretches under tension | Woven minimal, knit plush moderate to high | Panels too small if stretch is underestimated |
| Pile compression allowance | Loss of apparent volume from pile lying flat under stuffing pressure | Higher for long-pile or high-density fabrics | Silhouette appears flatter or less full than the pattern intended |
| Seam bulk allowance | Extra material needed where multiple seams converge | Most relevant at limb and ear joins | Puckering or distortion at multi-seam junctions |
| Fabric grain direction | Stretch and pile lay direction relative to panel orientation | Must be consistent across matching panels | Asymmetric stretch or pile shading between paired panels |
Why Fabric Stretch Behavior Must Be Tested, Not Assumed
Different plush fabrics — short-pile minky, long-pile shaggy fur, woven felt, bonded fleece — have dramatically different stretch and recovery characteristics, and a pattern developed for one fabric type will not automatically produce correct results if the same panel shapes are cut in a different fabric without adjustment. A knit plush fabric with significant two-way stretch requires meaningfully different ease allowances than a woven, minimally stretchy fabric, even for panels producing an identical target silhouette.
This matters most for buyers requesting a fabric substitution late in development, for cost, availability, or aesthetic reasons. A substitution is not simply a material swap — it frequently requires the pattern maker to re-evaluate and adjust ease allowances throughout the pattern, since the new fabric’s stretch and pile behavior interacts with the existing panels differently. Buyers who expect no pattern adjustment are often surprised when the resulting sample’s proportions shift subtly from the originally approved version, a predictable consequence of fabric behavior that a competent pattern maker should flag proactively.
Tip — Treat Fabric Substitutions as a Pattern Re-Evaluation Trigger, Not a Simple Swap
When cost pressure, material availability, or a design refresh leads to a request to substitute one fabric for another on an already-developed pattern, it is worth explicitly confirming with the factory whether the pattern has been re-evaluated for the new fabric’s stretch and pile characteristics, rather than assuming the existing pieces transfer unchanged. This matters most when switching between fabric categories with meaningfully different stretch behavior — knit plush to woven, or short-pile to long-pile fur — where the original ease allowances are least likely to remain appropriate. Asking directly, “will the pattern need adjustment for this fabric change, and will a new sample round be required to confirm the adjusted proportions,” surfaces this early and prevents the common, avoidable disappointment of a fabric-substituted sample that looks subtly different from the originally approved silhouette, through no fault of the sewing or stuffing execution.
What Role Does Pattern Complexity Play in Cost, Timeline, and Sampling Risk?
Not all plush toy patterns carry equal technical difficulty, and pattern complexity has direct, measurable effects on development cost, sampling timeline, and the overall risk of first-sample deviation — factors worth understanding before finalizing a design that pushes toward higher complexity without a clear reason.
More complex patterns require more panels, more precise seam and dart placement, more skilled pattern maker time, and typically more mock-up and revision iterations to reach an accurate result — all of which extend the timeline and increase cumulative sampling fees before an approved sample is reached. A simple, rounded, low-panel-count design can often reach approval in one or two rounds, while a highly detailed, multi-panel, asymmetric design with fine facial or costume detail frequently requires three or more rounds even with an experienced pattern maker.

Pattern Complexity Factors and Their Development Impact
| Complexity Factor | Low-Complexity Example | High-Complexity Example | Development Impact |
|---|---|---|---|
| Panel count | 6–10 panels (simple rounded bear) | 20–40+ panels (detailed character with costume elements) | More panels increase pattern maker time and seam-matching risk |
| Facial feature detail | Simple embroidered eyes, basic muzzle | Multi-layered facial construction with dimensional features | Requires more precise dart and seam placement around the face |
| Asymmetric design elements | Fully symmetric body and limbs | One-sided accessories, asymmetric posing | Cannot mirror panels; each side requires independent development |
| Articulated or posable elements | None | Wire-armature limbs, jointed rotation points | Pattern must accommodate internal structure clearance |
| Costume or layered elements | Single fabric layer throughout | Removable or layered costume pieces | Each layer requires its own pattern development and fit testing |
| Small-scale fine detail | Broad, simple shapes | Fine claws, small ears, delicate appendages | Small panels are technically harder to sew accurately at scale |
Balancing Design Ambition Against Development Efficiency
None of this argues against complex, highly detailed plush designs — some of the most commercially successful products in the market are exactly this kind of intricately patterned character. It is, instead, a case for understanding the development cost and timeline trade-off consciously rather than being surprised by it mid-sampling.
For buyers working with a fixed budget or an aggressive launch timeline, a useful exercise during the design phase is to review the concept with the factory’s pattern maker before finalizing artwork, asking which elements are driving the most complexity and whether any can be simplified without compromising the character’s appeal. Experienced pattern makers can often suggest an adjustment — consolidating two small panels, softening an asymmetric detail, simplifying a costume layer — that meaningfully reduces complexity while preserving the design’s core identity. This consultative review, done before the brief is finalized rather than after sampling has revealed the complexity cost, is one of the more underused efficiency levers available to buyers.
Tip — Request a Pattern Complexity Assessment Before Finalizing Artwork on an Ambitious Design
If a character design includes multiple small appendages, asymmetric elements, layered costume pieces, or fine facial detail, it is worth sending the concept artwork to the factory’s development team for a pattern complexity assessment before the artwork is locked — rather than discovering the complexity cost only after sampling has begun. A brief consultative review, where the pattern maker flags which elements are likely to require the most panels or sampling rounds, gives the buyer a clear-eyed view of the development investment the design will require and a chance to simplify specific elements if the timeline or budget doesn’t support the full complexity as conceived. This review typically takes only a few days and costs nothing beyond the factory’s willingness to give feedback before formal sampling fees are incurred, making it one of the highest-value, lowest-cost steps available in the earliest phase of development.
How Are Pattern Pieces Digitized, Documented, and Prepared for Cutting?
Once a pattern has been developed and validated through the mock-up and first sample stages, it must be converted into a stable, precisely documented, reproducible format the factory can use reliably for every subsequent cutting operation — whether the next sample round or a bulk production run of tens of thousands of units.
Pattern pieces are digitized and prepared for cutting through a process that typically involves scanning or digitally re-drafting each finalized panel shape into CAD pattern-making software, adding grain line indicators, seam allowance markings, and notches for sewing alignment, and organizing the complete panel set into a master pattern file stored as the factory’s permanent production reference for that product. This digitization step transforms a pattern from a one-off development artifact into a stable, reproducible manufacturing asset.
Pattern Digitization and Documentation Elements
| Documentation Element | Purpose | Why It Matters for Production Consistency |
|---|---|---|
| Digital panel outlines | Precise, scalable vector geometry for every piece | Eliminates degradation that occurs from repeated physical tracing |
| Grain line markers | Indicates correct fabric direction for each panel | Prevents inconsistent stretch or pile direction between units |
| Seam allowance lines | Marks the stitch line separately from the cut line | Ensures consistent seam allowance across all production cutting |
| Notches and alignment marks | Indicates how panels align during sewing | Prevents misalignment errors during assembly, especially on curved seams |
| Panel labeling system | Names and numbers every piece consistently | Prevents confusion between similar panels during cutting and sewing |
| Cutting layout/marker | Optimizes panel placement on fabric width | Minimizes fabric waste while maintaining correct grain direction |
| Master pattern file | Central digital record of the approved, confirmed pattern | Serves as the permanent reference for all future production runs |
Why Physical Pattern Templates Still Matter Alongside Digital Files
Despite the shift toward digital documentation, physical pattern templates — typically cut from stable cardboard, plastic sheet, or metal — remain standard for factories using manual or semi-automated cutting rather than fully automated digital cutting tables. These templates should be produced directly from the digitized master pattern file, so every physical template in circulation traces back to the same validated source geometry rather than being independently re-derived and introducing small inconsistencies.
For buyers auditing production capability, asking whether physical templates trace to the digital master file and how often they are inspected for wear provides useful insight into a factory’s consistency discipline — worn or independently-recreated templates carry higher risk of gradual dimensional drift meaningfully across a long production run.
What Is Pattern Grading and How Does It Extend a Single Design Into a Size Range?
Many plush toy programs require the same character design in multiple sizes — a small keychain version, a medium collectible size, a large plush version — and the technical process that extends a single validated base pattern into an accurate, proportionally consistent size range is called grading.
Pattern grading mathematically scales a validated base pattern to produce additional sizes while preserving the design’s correct proportions, seam relationships, and overall appeal at every size. It is not simply a uniform percentage scaling of every dimension — elements like seam allowances, fabric thickness, and accessory components such as plastic eyes do not scale proportionally with the rest of the design, so a pattern maker must apply size-specific adjustments to prevent these non-scaling elements from producing a distorted result at the smallest or largest sizes.
Common Pattern Grading Challenges by Size Direction
| Grading Challenge | Effect at Smaller Sizes | Effect at Larger Sizes | Correction Approach |
|---|---|---|---|
| Seam allowance proportion | Becomes proportionally larger relative to panel size | Becomes proportionally smaller relative to panel size | Adjust seam allowance ratio rather than scaling uniformly |
| Accessory scaling (eyes, noses) | Standard accessory sizes may appear oversized | Standard accessory sizes may appear undersized | Source size-appropriate accessory components per size tier |
| Fabric pile height proportion | Pile appears proportionally longer/denser at small scale | Pile may appear proportionally sparse at large scale | Consider pile height adjustment across the size range |
| Fine detail feasibility | Small panels become difficult to sew accurately | Fine detail may appear disproportionately small | Simplify fine detail below a minimum feasible panel size |
| Stuffing density consistency | Small cavities are harder to stuff evenly | Large cavities require more stuffing volume management | Adjust stuffing procedure and target density per size |
Validating Every Size in the Range Independently
A disciplined grading process treats each size in a product range as requiring its own sampling validation, rather than assuming approval of the base or “true” sample size guarantees every graded size will be equally accurate. This is a common point of confusion for buyers new to multi-size plush programs, who expect grading to be a purely mechanical, error-free operation once the base pattern is approved.

In practice, the smallest and largest sizes in a graded range are most likely to reveal the proportional issues described above, and a professional process includes sampling and evaluation at every size tier — not just the base — before the full range is approved. Buyers commissioning a multi-size range should confirm with the factory that each size will be sampled and evaluated independently, and budget development time and fees accordingly rather than assuming base-size approval extends automatically to the rest of the collection.
Tip — Never Approve a Multi-Size Product Range Based on the Base Size Sample Alone
When a program includes multiple sizes of the same character — common for collectible lines, tiered retail pricing, or gift-with-purchase programs — resist approving the entire size range based on a single base-size sample, even an excellent one. Grading challenges around seam allowance proportion, accessory scaling, and fine detail feasibility tend to concentrate at the extremes of a size range, so the smallest and largest sizes are most likely to reveal a problem the base sample gave no indication of. Insist on evaluating a physical sample of every distinct size before granting final production approval, and build the additional sampling time and fees into the program’s budget from the outset. Skipping this step to save a modest sampling cost is one of the more common causes of a multi-size collection reaching retail with one or two sizes that noticeably underperform the others.
What Are the Most Common Pattern Making Mistakes That Cause Sample Deviations?
Understanding pattern making theory is useful, but the most practically valuable knowledge for a buyer is recognizing the specific, recurring mistakes that most commonly cause a first sample to deviate from the intended design — mistakes that follow predictable patterns across different factories and projects.
These fall into several recognizable categories: insufficient reference art provided to the pattern maker, inadequate accounting for fabric-specific stretch and pile behavior, dart or seam placement decisions that prioritize construction ease over silhouette accuracy, skipped or rushed mock-up validation, and inconsistent panel labeling or grain direction marking that produces asymmetric results between paired panels such as ears or limbs.
Common Pattern Making Mistakes and Their Downstream Consequences
| Mistake | Root Cause | Downstream Consequence | Prevention |
|---|---|---|---|
| Insufficient reference art | Buyer provides only front-view artwork | Pattern maker guesses at side/back proportions | Provide front, side, back, and 3/4 view reference |
| Ignoring fabric-specific stretch | Pattern developed without testing actual specified fabric | Finished sample proportions differ from pattern intent | Validate ease allowances with the actual specified fabric |
| Construction-driven seam placement | Seam placed for sewing ease rather than silhouette | Visible, awkwardly placed seam lines on finished product | Prioritize silhouette in seam planning; solve construction second |
| Skipped mock-up stage | Time pressure leads directly to final-fabric sampling | Proportion errors discovered late, requiring costly rework | Always validate proportion through mock-up before final sample |
| Inconsistent panel marking | Paired panels (ears, limbs) not clearly matched and marked | Visible asymmetry between left and right elements | Systematic labeling and grain marking for all paired panels |
| Ignoring seam bulk at junctions | Multiple seams converge without allowance for fabric bulk | Puckering, distortion at limb or ear attachment points | Plan seam convergence points explicitly during pattern development |
| Grading without size-specific validation | Assuming uniform scaling produces accurate results at all sizes | Smallest/largest sizes show proportional distortion | Sample and evaluate every size tier independently |
The Reference Art Problem in Detail
Among all the mistakes in the table above, insufficient reference art is both the most common and the most easily prevented — and it originates with the buyer’s brief rather than the factory’s technical execution. A pattern maker working from a single front-view illustration must make independent creative decisions about the character’s side profile, back detail, and three-dimensional depth, decisions that may not match what the buyer had in mind simply because that information was never communicated.
Providing genuinely complete reference art — front, back, both side profiles, and ideally a three-quarter view — along with any existing 3D reference the design team has, gives the pattern maker dramatically more information to work from and correspondingly reduces the number of independent interpretive decisions required. This is one of the most direct, controllable levers a buyer has over first-sample accuracy, and it costs nothing beyond the design team’s own time to prepare complete reference material before the brief is submitted.
Tip — Provide a Physical or Digital 3D Reference Whenever the Character Design Allows It
Flat, two-dimensional reference art — even complete front, back, and side views — still requires the pattern maker to infer the character’s three-dimensional volume, and different pattern makers will sometimes infer that volume differently from the same flat artwork. Whenever feasible, providing an actual three-dimensional reference alongside the flat artwork closes this interpretive gap far more effectively than additional 2D views alone. This can take several forms: a digital 3D sculpt file, a simple clay or foam maquette, a 3D-printed rough form, or a close reference to an existing similar product with notes on which proportions should be adjusted. Any of these give the pattern maker a tangible three-dimensional target rather than requiring them to construct one purely from imagination — and across a wide range of design sophistication levels, this single addition to the design brief consistently produces the largest single improvement in first-sample proportional accuracy of any brief enhancement available.
How Does Pattern Quality Connect to Long-Term Production Consistency?
The value of a well-developed, well-documented pattern extends far beyond the immediate sampling process — it is the foundation that determines how consistently the product can be reproduced across every subsequent production run, potentially over years of reorders and multiple production batches.
Pattern quality connects to long-term consistency because the pattern is the objective, reproducible reference standard every future cutting and sewing operation depends on, regardless of which workers perform the work on a given day or batch. A precisely developed, thoroughly documented pattern produces consistent results even as personnel changes over time, the normal reality of any factory’s workforce. A poorly documented or ambiguous pattern, by contrast, leaves room for interpretation that introduces variation between batches, teams, and even shifts within the same factory.
This matters most for buyers planning multi-year programs with regular reorders, where the pattern developed during initial sampling may be used to produce the same product dozens of times over an extended commercial life. Investing in pattern quality and documentation rigor at the outset — even when it adds modest time and cost initially — pays back through more consistent quality across every reorder, reducing the QC burden and the risk of gradual product drift that can otherwise occur silently over a long production relationship. At Xing Wang Plushie, this is precisely why pattern development and digitization are treated as a formal, documented stage of every custom project rather than an informal internal step — the master pattern file becomes a permanent production asset that protects consistency for every buyer’s reorder, not just the first run.

Tip — Request the Digitized Master Pattern File as Part of Your Production Documentation Package
For buyers running significant production volumes or planning a multi-year relationship, it is reasonable to request that the digitized master pattern file — or at minimum, confirmation that one exists and is maintained as the factory’s official production reference — be included as part of the formal documentation package alongside the tech pack and approved sample. The pattern file itself typically remains factory intellectual property and is not transferred outright, but visibility into its existence, format, and how it is protected against loss or corruption gives buyers meaningful assurance about long-term consistency risk. This matters most when evaluating a new manufacturing partner for a program expected to run across multiple reorder cycles, where the durability of the factory’s internal documentation practices directly affects how consistently the product performs order after order, long after the original sampling team’s institutional memory has faded.
Conclusion
Pattern making is the technical foundation on which every subsequent stage of plush toy development and production is built, and yet it remains one of the least visible and least understood parts of the process for most buyers sourcing custom plush products. A design brief, however thorough, is only the starting input to a genuinely skilled engineering process — one that requires translating flat, two-dimensional concept art into a precisely calculated set of fabric panels that will produce the correct three-dimensional form once cut, sewn, and stuffed, and that will continue to reproduce that form accurately across every unit in a production run that may extend to tens of thousands of pieces over multiple years.
Buyers who understand how pattern making works — who provide complete reference art, engage with mock-up validation before final sampling, ask informed questions about a factory’s documentation and digitization practices, and treat fabric substitutions and multi-size grading as events requiring dedicated pattern re-evaluation rather than simple mechanical operations — consistently achieve more accurate first samples, fewer revision rounds, and more reliable long-term production consistency than those who treat pattern making as an invisible process they do not need to engage with.
The frameworks and practical guidance in this article are intended to close that gap — giving buyers the working knowledge to ask sharper questions during factory evaluation, write briefs that give pattern makers what they actually need, and recognize early when a sampling deviation traces back to a pattern-level issue rather than a construction or material problem. Pattern making will never be a process most buyers perform themselves, but understanding it well enough to engage with it intelligently is one of the most underrated skills a serious sourcing professional can develop.
FAQ
Q1: How long does the pattern making stage typically take within the overall plush toy sampling timeline?
Pattern timelines vary with design complexity, but for a moderately complex character, development — from silhouette analysis through mock-up validation and finalization — typically takes three to seven days, running in parallel with material sourcing rather than sequentially before it. Highly complex, multi-panel, or asymmetric designs can extend this to two weeks or more, particularly when several mock-up iterations are needed. Buyers working to a fixed launch timeline should factor design complexity into their schedule expectations rather than assuming a uniform pattern-making duration regardless of difficulty.
Q2: Can a buyer request changes to the pattern after the first sample has already been approved?
Yes, though the cost depends heavily on timing. A change requested before bulk material has been cut or templates produced is relatively straightforward — pattern maker time to develop and validate the revision, followed by a confirmation sample. A change requested after bulk cutting has begun, or worse, after production is partially complete, is significantly more disruptive, potentially requiring scrapped materials, delayed delivery, and a full restart of template production. This is a strong argument for design freeze discipline before final approval — the cost of a pattern change rises sharply at every stage the product progresses past that point.
Q3: Does a more experienced pattern maker always produce a better result, regardless of the design?
Experience is a strong predictor of quality, but not the only factor. A pattern maker with years of experience on simple, traditional designs may not excel at a highly stylized or geometric character that departs from conventional plush proportions. When evaluating a factory for a specific design, it is more useful to ask for portfolio examples that resemble the current project’s style and complexity than to rely on years of experience alone — similar prior work is generally a more reliable predictor of first-sample accuracy.
Q4: Is it possible to reuse or adapt an existing pattern from a similar previous character to save cost and time?
Yes — this is common and effective when a new character shares genuine structural similarity with a previously developed design: similar body proportions, limb and head configuration, or the same product family. The pattern maker can adapt the existing validated pattern rather than starting from scratch, reducing both timeline and sampling rounds since much of the underlying construction logic is already proven. This works best when the similarity is structural, not just stylistic — two characters sharing an art style but differing fundamentally in proportions will not benefit as much, and forcing the adaptation can introduce more revisions than starting fresh.
Q5: How does pattern making differ for weighted plush toys or those with internal mechanisms?
Weighted plush toys and those containing sound modules, motorized components, or wire armatures introduce added pattern complexity, since the pattern must account for internal component placement, insertion access points, and reinforcement around hard components that could otherwise wear through the fabric. The pattern maker typically coordinates with the engineering or mechanism sourcing team early to confirm exact dimensions before finalizing panel geometry, since retrofitting these accommodations later usually requires substantial rework rather than a minor adjustment.